[TOC]
摘要
学习参考文献
CSS:Cascading Style Sheets 层叠样式表
基础知识
语法
选择器 {属性:值}
h1 {color:blue; font-size:12px;}
选择器是要改变样式的HTML元素
属性是样式属性(style attribute)
注释
/*这个是注释*/
CSS样式表的插入
-
外部样式表
.CSS后缀的文件,内部不含HTML标签。 -
内部样式表
在HTML文件头部的<style>标签内定义。
-
内联样式
在HTML标签内,使用style属性定义。
选择器类型
总共四种:内联选择器 > id选择器 > 类选择器 > 标签选择器
-
标签选择器
在HTML的<style>标签内写的CSS语法,用于描述一类HTML标签的样式属性。
<style> h3 {color:red;} </style> -
类选择器
在HTML的<style>标签内写的CSS语法,用于描述一类元素的选择器。
<!--在style中设定center类的样式--> <style> .center { text-align:center; } p.another { color:red } </style> <!--之后使用的方法--> <h1 class="center">类选择器,使用通用的类的</h1> <p class="another">类选择器,只用于p属性的类的</p> -
id选择器
和类选择器类似,但是不是用HTML元素的class属性设置,而是用id属性设置。
<!--在style中设定指定id para1的样式--> <style> #para1 { text-align:center; color:red; } </style> <!--之后使用的方法--> <p id="para1">你好,世界!!!</p> -
内联选择器
直接在标签内部写明
<h3 style="color:red;">嘻嘻</h3> -
组选择器
td, th { /*td和th都会应用*/ border: 1px solid #ddd; padding: 8px; } -
后代选择器
#customers td { /*(得是id=customer的td类才会被应用)*/ border: 1px solid #ddd; padding: 8px; } -
关系选择器
-
临近兄弟元素选择器A+B
选择紧接在第一个元素A之后的元素B,且两者要有相同的父元素。下面的例子选取了紧接在img元素后的p元素
img + p { font-style: bold; } -
兄弟元素选择器A~B
选择在第一个元素A之后的所有同层级元素B,两者无需紧接。
div~p { background-color:yellow; } -
直接子元素选择器A>B
选择元素A的所有元素B子元素
div>p { backgorund-color:yellow; } -
属性
背景属性
| 属性名 | 用途 | 例子 | 备注 |
|---|---|---|---|
| background-color | 定义背景颜色 | h1 {background-color:#6495ed;}p {background-color:#e0ffff;}div {background-color:#b0c4de;} |
如果一个元素没有指定背景色,那么背景色为透明。 |
| background-image | 定义背景图像 | body {background-image:url('paper.gif');} |
默认情况下背景图像平铺重复显示。 |
| background-repeat | 设置背景图像的平铺 | 1. 只在水平方向平铺:body<br/>{background-image:url('gradient2.png');background-repeat:repeat-x;}2. 设置不平铺: body<br/>{background-image:url('img_tree.png');background-repeat:no-repeat;} |
|
| background-position | 设置背景图像的起始位置 | body {backgournd-image:url("image.png");background-posion:right left} |
background-position的值可以是关键字:top、bottom、left、right和center,也可以是长度值,如100px或5cm,也可以用百分数值。(都是最多两个值);还可以是和边框的偏移值:bottom 10px right 20px |
| background-attachment | 设置背景图像是否固定 | body {background-image:url('smiley.gif');background-repeat:no-repeat;background-attachment:fixed;} |
scroll: 随页面滚动fixed: 图像固定local: 随滚动元素滚动(? |
文本属性
| 属性名 | 用途 | 例子 | 备注 |
|---|---|---|---|
| color | 指定文字颜色 | body {color:blue;}h1 {color:#00ff00;}h2 {color:rgb(255,0,0);} |
可以用 - 16进制:#00ff00 - RGB值:rgb(255,0,0,) - 颜色名词:red 描述 |
| text-align | 指定文本对齐方式 | h1 {text-align:center;}p.date {text-align:right;}p.main {text-align:justify;} |
justify: 每一行展开宽度相等 |
| text-decoration | 设置或者删除文本装饰 | 1. 可以用来删除连接的下划线:a {text-decoration:none;}2. 可以用来装饰文字: h1 {text-decoration:overline;}h2 {text-decoration:line-through}h3 {text-decoration:underline} |
|
| text-transform | 设置文本中的大小写 | 1. 全大写:p.uppercase {text-transform:uppercase;}2. 全小写: p.lowercase {text-transform:lowercase;}3. 每个单词首字母大写: p.capitalize {text-transform:capitalize;} |
|
| text-indent | 设置文本缩进长度 | p {text-indent:50px;} |
|
| word-spacing | 设置单词之间的间隔 | p{word-spacing:30px;} |
|
| letter-spacing | 设置字之间的间隔 | h1 {letter-spacing:2px;}h2 {letter-spacing:-3px;} |
|
| line-height | 设置行距 | p.small {line-height:70%;} |
|
| white-space | 设置根据浏览器窗口自动换行 | p{white-space:nowrap;} |
设置为nowrap的话不会自动换行 |
| text-shadow | 添加文本阴影 | h1 {text-shadow:2px 2px #FF0000;} |
 |
字体
字体有两种分类:
- 通用字体系列:拥有相似外观的字体组合
- serif: 有锐利边缘的字体
- sans-serif: 和serif相反,比较圆滑
- monospace: 等宽字体
- 特定字体系列
- Times、宋体之类的专指某种字体的
| 属性名 | 用途 | 例子 | 备注 |
|---|---|---|---|
| font-family | 设置文本的字体系列 | p{font-family:”Times New Roman”, Times, serif;} | 设置多种字体作为备用字体,防止浏览器无法显示第一种字体。 如果字体名字超过一个字,需要用引号,如”宋体“。 |
| font-style | 设置字体样式 | 1. 正常显示文本:p.normal {font-style:normal;}2. 斜体: p.italic {font-style:italic;}3. 倾斜的文字(类似斜体): p.oblique {font-style:oblique;} |
|
| font-size | 设置字体大小 | 1. 设置字体大小像素:h1 {font-size:40px;}2. 使用em单位设置字体大小。1em=16px: h1 {font-size:2.5em;}3. 使用百分比和em组合调整字体大小: body {font-size:100%;}h1 {font-size:2.5em;} |
|
| font-weight | 设置字体加粗 | p.normal {font-weight:normal;}p.light {font-weight:lighter;}p.thick {font-weight:bold;}p.thicker {font-weight:900;} |
链接
连接共有四种样式:
a:link:正常未访问过的链接a:visited:已访问过的连接a:hover:当用户鼠标放在链接上时a:active:链接被点击的一刻
设置CSS:link选择器时,a:hover必须在a:link和a:visited后面,a:active必须在a:hover后面
其他的属性类似文本属性
例子:
a.one:link {color:#ff0000;}
a.one:visited {color:#0000ff;}
a.one:hover {color:#ffcc00;}
列表
CSS可以将HTML中列表的格式进行统一的设置。
| 属性名 | 用途 | 例子 | 备注 |
|---|---|---|---|
| list-style-type | 列表项标记(即列表前面的小圆点) | 1. 无序列表:ul.a {list-style-type: circle;}ul.b {list-style-type: square;}2. 有序列表: ol.c {list-style-type: upper-roman;}ol.d {list-style-type: lower-alpha;} |
none:不用项目符号 disc:实心圆 circle:空心圆 square:实心方块 decimal:阿拉伯数字 lower-alpha:小写英文数字 upper-alpha:大写英文数字 lower-roman:小写罗马数字 upper-roman:大写罗马数字 |
| list-style-image | 使用图像作为列表项标记 | ul{list-style-image: url('sqpurple.gif');} |
|
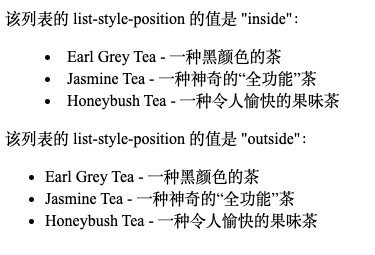
| list-style-posion | 设置列表项的位置 | inside:ul.inside {list-style-position: inside}outside:默认值 ul.outside{list-style-position: outside} |
 |
表格
| 属性名 | 用途 | 例子 | 备注 |
|---|---|---|---|
| border | 指定表格边框 | table, th, td {border: 1px solid black;} |
|
| border-collapse | 指定表格边框是否互相重合 | 1. collapse(合并):table{border-collapse:collapse;}2. sperate(默认分开): table {border-collapse:separate;} |
|
| width/height | 指定表格的宽度和高度 | table {width:100%;}th {height:50px;} |
|
| text-align | 表格文字横向对齐方式 | td {text-align:right;} |
可以设置center、right、left |
| vertical-align | 表格文字纵向对齐方式 | td {height:50px; vertical-align:bottom;} |
可以设置bottom、center、top |
| padding | 设置表格文字和边框之间的距离 | td {padding:15px} |
|
| background-color | 表格背景颜色 |
表格有一个:nth-child伪类,可以处理规律的表格元素变化(比如奇偶行不同的背景色)
#customers tr:nth-child(even){background-color: #f2f2f2;}
我们还可以使用:hover类,即鼠标移到表格行上时改变元素:
#customers tr:hover {background-color: #ddd;}
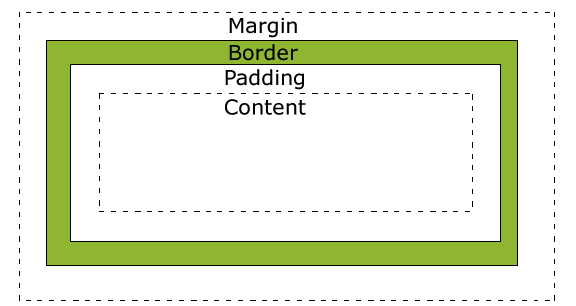
盒模型
用于设置HTML元素边距、边框、填充和内容放置位置。
/*CSS设置*/
div.ex
    {
    width:220px;
    padding:10px;
    border:5px solid gray;
    margin:0px;
    /* 左右margin:margin-left和margin-right。居中用margin:auto或者margin-right:auto*/
    }

<!--HTML设置-->
<div class="ex">这个框的宽度就是250</div>
这种设置方法中,可以使用两种方法:
- 3pt或0.2em等固定的长度值
- 百分比:定义为父类的比例
边框(Border)
| 属性名 | 用途 | 例子 | 备注 |
|---|---|---|---|
| border-style | 定义边框样式 | p.none {border-style:none;}p.dotted {border-style:dotted;}p.dashed {border-style:dashed;} |
none:默认,没有边框 dotted:点边框 dashed:虚线边框 solid:实线边框 double:双线边框 groove:3D沟槽边框 ridge:3D脊边框 inset:3D嵌入边框 outset:3D突出边框 |
| border-top-style border-right-style border-bottom-style border-left-style |
定义不同边的边框样式 | p{` border-top-style:dotted; <br/> border-right-style:solid;<br/> border-bottom-style:dotted;<br/> border-left-style:solid;<br/>}` |
|
| border-width | 定义边框宽度 | 两种方法: 1. 指定长度值:2px或0.1em 2. 使用关键词:thin/medium/thick |
|
| border-color | 定义边框颜色 |
显示与隐藏
| 属性名 | 用途 | 例子 | 备注 |
|---|---|---|---|
| visibility | 隐藏元素 | h1:hover {visibility:hidden;}h1 {visibility:visible} |
隐藏的元素仍然占用空间。 visible:可见 hidden:隐藏 |
| display | 设置元素的内外部显示类型 | 外部类型: 1. block:生成块级元素盒子,在该元素之前和之后换行 2. inline:生成行内元素盒子,在该元素之前和之后不会换行 3. inline-block: 对象呈现为inline对象,内容为block对象呈现(不会换行) 其他属性: 1. none:将元素排除出显示层(不占用页面) |
定位属性
定位属性用于指定元素在文档中的定位方式,而top/right/bottom/left属性决定了元素的最终位置
| 属性名 | 用途 | 例子 | 备注 |
|---|---|---|---|
| position | 定位元素的类型 | 1. fixed,固定元素在浏览器中p.pos_fixed {position:fixed;top:30px;right:5px;}受top/bottom/left/right/z-index影响 2. relative: 相对定位元素(相对其正常位置) p.pos_fixed {position:relative;top:-50px;}3. absolute: 绝对定位的元素的位置相对于最近的已定位父元素,如果元素没有已定位的父元素,那么它的位置相对于 <html> |
z-index: 定义元素的堆叠顺序 |
| overflow | 设置到元素内容溢出区域时发生的事情 | 1. visible: 默认值,内容不会被修剪,会被呈现在元素框外 2. hidden: 内容会被修剪,且其余内容不可见 3. scroll:内容会被修剪,但是可以显示滚动条查看其余内容 4. auto: 如果内容被修剪,则以滚动条形式查看其余内容 5. inherit:从父元素继承overflow属性 |
|
| cursor | 定义光标移动到元素上时的形状 | 1. url: 自定义图像光标 2. default:默认光标 3. auto: 默认,浏览器设置的光标 4. crosshair: 光标呈现为十字线 5. pointer: 光标成纤维指示连接的指针(一只手) 6. move: 光标指示对象可移动 7. help: 帮助问号 8. progress: 前进等待 9. s-resize: s-调整(看起来像往下的箭头) |
浮动
| 属性名 | 用途 | 例子 | 备注 |
|---|---|---|---|
| float | 指定一个元素应沿其容器的左侧或右侧放置,允许文本和内联元素环绕它。 | img {float:right;} |
1. left: 表明元素必须浮动在其所在的块容器左侧。 2. right: ……右侧…… 3. none: 元素不进行浮动。 |
| clear | 指定一个元素的左侧或右侧不能出现浮动元素(独占一行?) | img {clear:both;} | 1. left: 左侧不能出现浮动元素 2. right: 右侧不能出现浮动元素 3. both: 两侧都不能出现滑动元素 4. none: 默认值,允许浮动元素出现在两侧 |
伪类
| 属性名 | 用途 | 例子 | 备注 |
|---|---|---|---|
| :link | 未访问对象 | ||
| :visited | 访问过的对象 | ||
| :active | 正在活动对象 | ||
| :hover | 鼠标放在对象上的状态 | ||
| :focus | 应用于元素具有焦点的时间内 | 比如在输入文字框中使用:focus定义选中时的背景颜色 | |
| :first-letter | 元素的第一个字母 | ||
| :first-line | 元素的第一行 | ||
| :first-child | 匹配第一个子元素 | ||
| :before | 在选定元素之前插入内容 | p:before {content:"Read this -";} |
|
| :after | 在选定元素之后插入内容 |
伪元素
伪元素需要用::区分于伪类的:(W3C标准也可以不用)
导航栏
在HTML中,导航条实际上时连接列表,用<ul>定义无序列表。
下拉菜单
使用:hover伪类和display隐藏和显示元素
<style>
/* 容器 <div> - 需要定位下拉内容 */
.dropdown {
    position: relative;
    display: inline-block; }
/* 下拉内容 (默认隐藏) */
.dropdown-content {
    display: none;
    position: absolute; }
/* 下拉菜单的链接 */
.dropdown-content a {
    text-decoration: none;
    display: block; }
/* 鼠标移上去后修改下拉菜单链接颜色 */
.dropdown-content a:hover {background-color: #f1f1f1}
/* 在鼠标移上去后显示下拉菜单 */
.dropdown:hover .dropdown-content {
    display: block; }
/* 当下拉内容显示后修改下拉按钮的背景颜色 */
.dropdown:hover .dropbtn {
    background-color: #3e8e41; }
</style>
可以用下拉菜单实现的:图片在网页上的放大查看;导航条的细节下拉。
图像
| 属性 | 用途 | 例子 | 备注 |
|---|---|---|---|
| opacity | 改变不透明度 | img {opacity:0.4;filter:alpha(opacity=40);} | 从0.0-1.0,值越小元素越透明。 filter:alpha(opacity=x)是IE8和早期版本采用的方法,x取0-100 |